
Android: Using WPA2-Enterprise
It is very sad that WPA2-Enterprise is not available to be configured in the WIFI-Settings dialog. But if you know how to configure it by hand you can get it to work. I want to use my schools WPA2-Enterprise so I tried it and found out how to get it working. I will explain my taken steps below so you can as well get it to work. The trick behind is that you edit the /data/misc/wifi/wpa_supplicant.conf by hand. In that file the configuration of the wifi-networks is saved. You need to add the following lines: (in my example for the HSR-Secure network)
network={
   ssid="HSR-Secure"
   key_mgmt=WPA-EAP
   identity="<username without 'hsr\'>"
   password="<your password>"
}
For those who don’t know how to do that here some more explanation. To edit the mentioned file above your phone has to be rooted. Than you need the Android SDK installed on your computer (we will need adb.exe). You need the usb cable to connect the phone to your computer. Open a command line shell and go to your android-sdk tools folder and then do the following (thanks to Thomas Kälin for this easier version):
Copy the config file from the phone to your computer:
adb pull /data/misc/wifi/wpa_supplicant.conf C:/MyFolder
Now Edit your wpa_supplicant.conf with your favorite editor and load it back to your phone:
adb push C:/MyFolder/wpa_supplicant.conf /data/misc/wifi/wpa_supplicant.conf
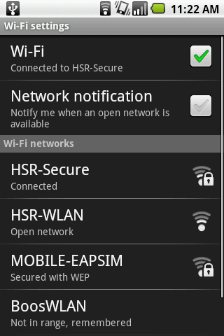
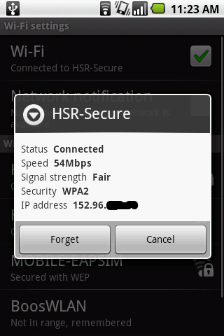
Now go to the wifi settings in your phone. Turn wifi off and on again. It should successfully connect now. Here some pictures to show how it should look like when working.
I hope this helps some of you to get WPA2-Enterprise working.
Have fun surfing the internet with your phone at work/school :).